- Nomad
- Containers In Production Map
- Task Drivers
- Nomad Deployment Guide
- Get Docker CE for Debian
- Load Balancing Strategies for Consul
In this episode, we are going to be checking out HashiCorp’s Nomad. Nomad is a pretty cool tool for generic workload orchestration. But, what does that actually mean? Well, Nomad is sort of similar to something like Mesos, Docker Swarm, or Kubernetes, in that it allows you to do container orchestration. But, Nomad is pretty generic, in that is allows you do to non-container based application orchestration too. We will cover both these use-cases via a few demos in a minute. Since Nomad can do both, non-container, and container based orchestration, this makes it pretty unique.
Just as a quick recap, let’s quickly chat about what is orchestration, and why people are using it? Well, say for example, that you have a program that runs really well on a single machine, but you need to run that across lots of machines, maybe for added compute resources, or high availability. This is typically what you would use orchestration for. It allows you to go from running things on a single machine, to running things on many machines, and offload most of the operation complexity to orchestration tools like Nomad. But, it is not really that simple, since you might need software changes, or architecture change to your application to support this. But, that’s the general idea. When you make the leap from running things on one machine, to running things on lots of machines, all types of operation issues appear, like how do you deploy things with zero downtime, checking if they running, what is the health, if they fail, restart them, etc. So, orchestration software like Nomad does all that for you, and can really lighten the load of your operations team.
Lets jump over to the Containers In Production Map for a second. I see Nomad falling into the Container Orchestration category, along with tools like, Mesos, Kubernetes, and Docker Swarm. However, I think of Nomad as a little more generic and less opinionated than some of the other platforms, as it supports multiple methods for task orchestration besides just containers.
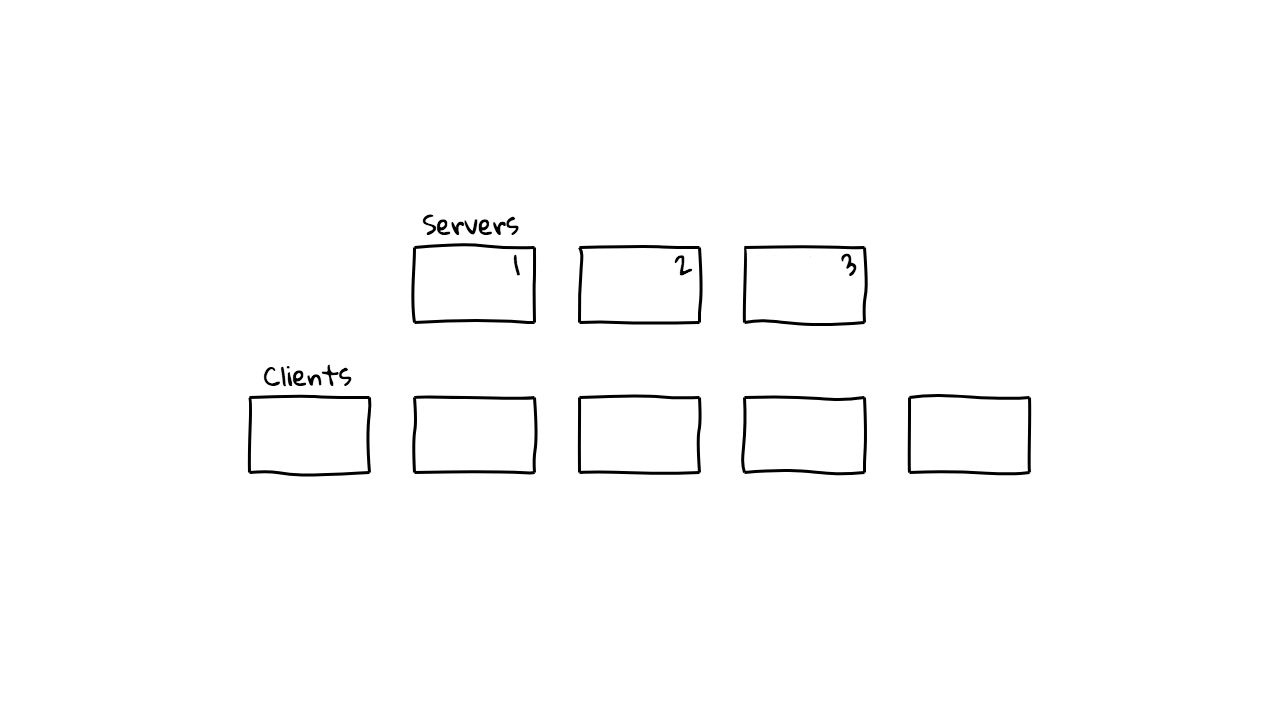
Lets quickly walk through how Nomad works in general. So, back in episode #56 on Kubernetes the General Explanation, I sort of walked through container orchestration at a high-level too, by way of a few diagrams. I’m just going to do the same thing here and explain how Nomad works architecturally. Nomad is a client server workload orchestration system. You will typically have between 3 to 5 server nodes that manage state within the cluster. Then, you will have a bunch of client or worker nodes where your tasks are actually running.
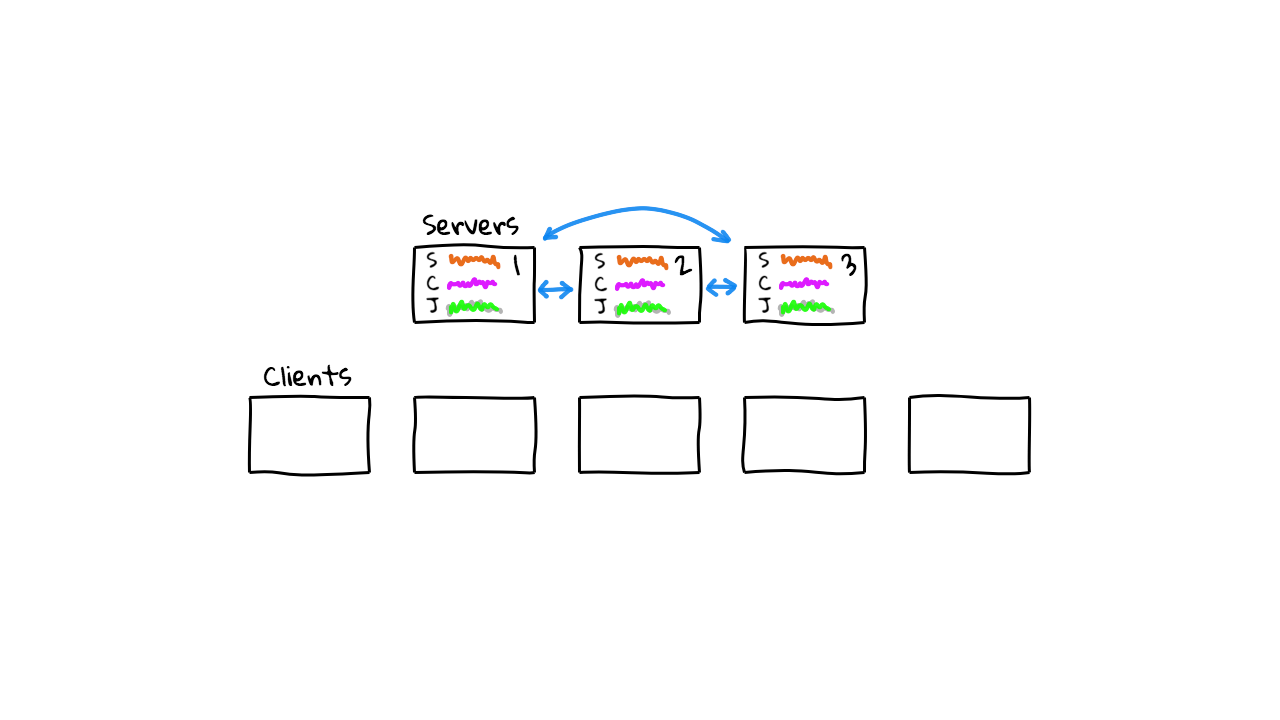
In Kubernetes, this would translate to Master and Worker node terminology. These server nodes are chatting with each other constantly and syncing cluster state information. Things like server state, client state, and job state. This gets replicated across all the server nodes, so that if the cluster leader goes down, an alternate can takeover.
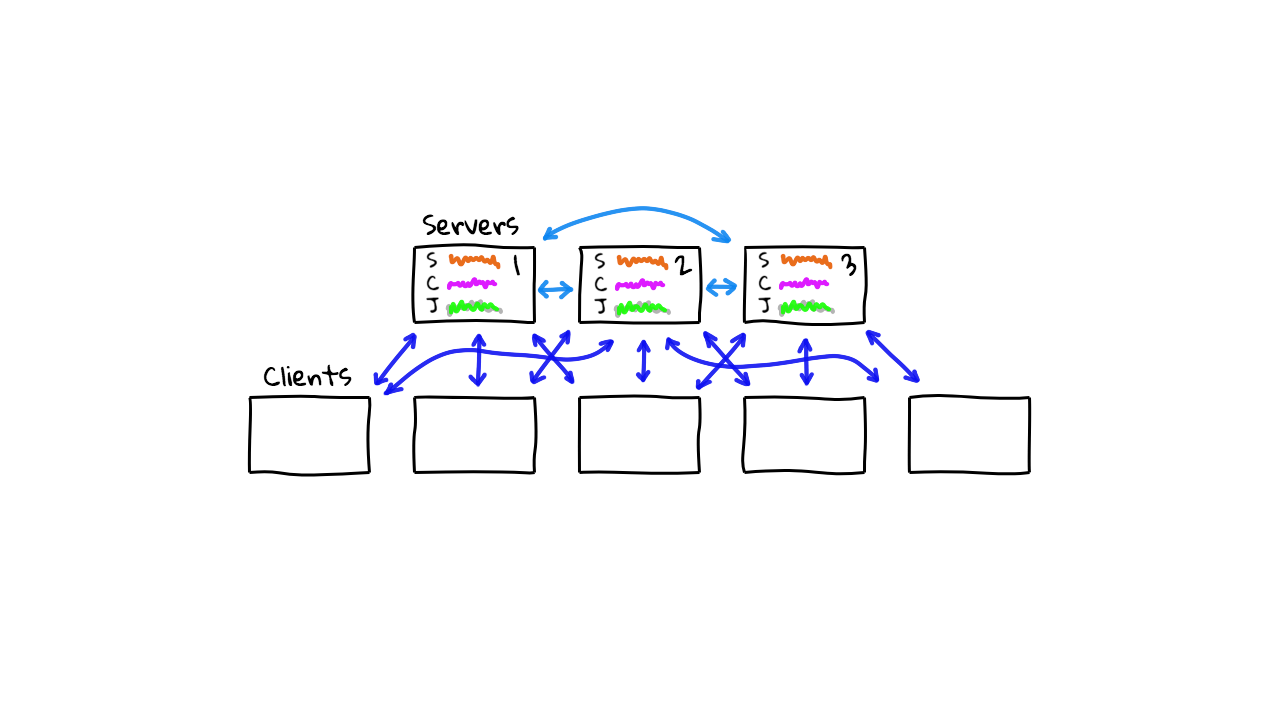
The servers are constantly keeping track of what is happening on the clients too. So, architecturally speaking, this looks very similar to how something like Mesos, Swarm, or Kubernetes might look. Although, the way Nomad implements this, is much simpler and straightforward, in that there are not many moving pieces, and it is super easy to debug what is happening. For example, with something like Kubernetes, there are lots of supporting services, and moving pieces that you need to worry about. Where as, with Nomad, it is just a single binary with a few configuration files.
Just like many of the other orchestration schedulers out there. You can submit jobs into the Nomad cluster, by defining your job in a configuration file, and then submitting it to the Nomad API. So, lets say we create a job called example, and we want to spin up a Redis container instance using Docker.
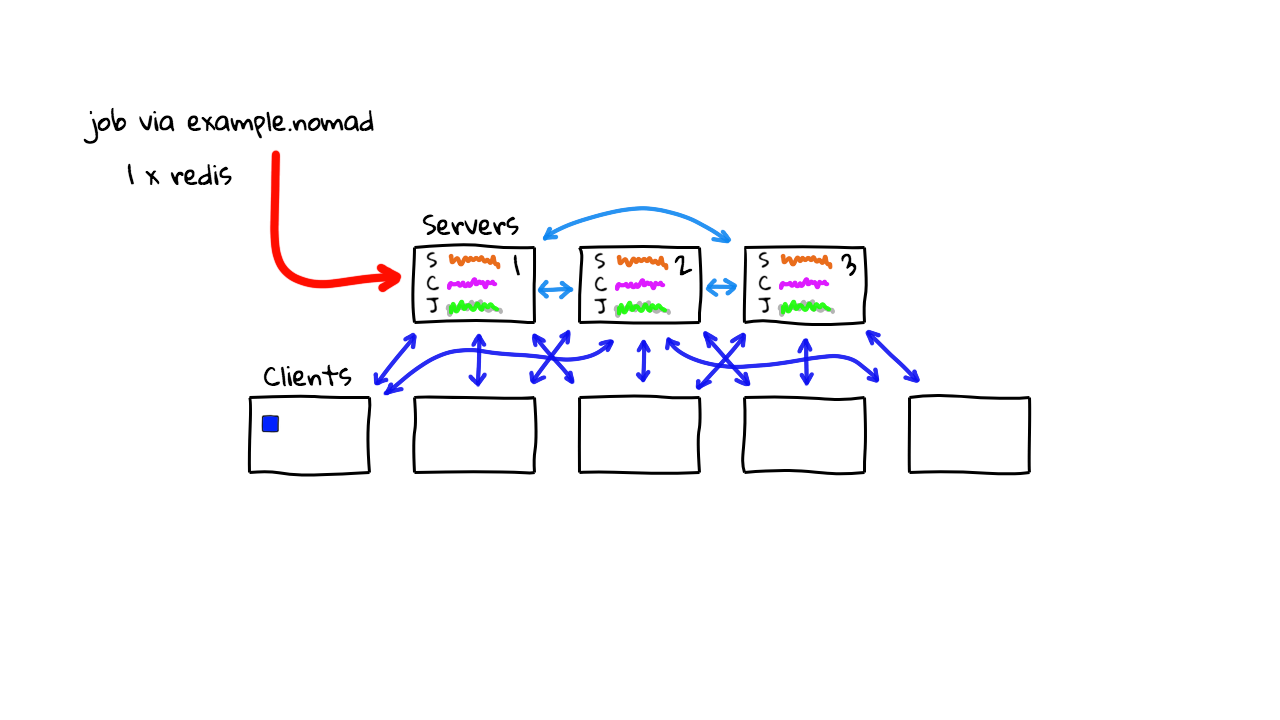
The Nomad cluster will validate if this is a good configuration, check that there is a worker node who can support this type of workload, and then spin up that workload, on say worker 1 here. Then, say down the road, you wanted to move into a high availability mode with Redis, so you want 3 instances of it running. You submit a request for this job into the Nomad cluster, it will plan and schedule these additional container tasks for you, on other available nodes in the cluster.
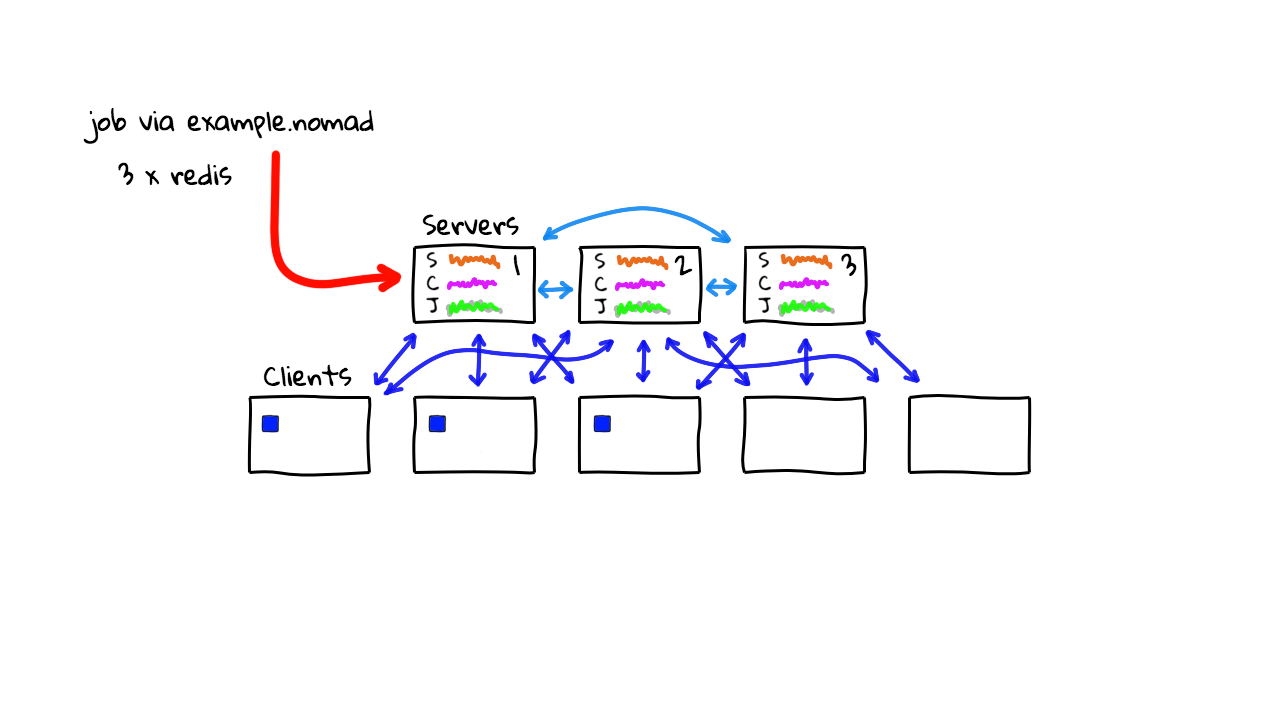
Alright, so this is pretty standard stuff so far in terms of container orchestration. But, what makes Nomad different? Well, Nomad supports many different job formats via supporting task drivers. Lets jump over to the docs for a minute. Here’s Nomad Task Driver page and it shows you the supported workloads Nomad can schedule into your cluster. So, you can see over here, there is support for things like running containers, executables, Java programs, virtual machines, and more. Lets click into the Docker driver here and have a look.
task "webservice" {
  driver = "docker"

  config {
    image = "redis:3.2"
    labels {
      group = "webservice-cache"
    }
  }
}
Down here you can see the task configuration, and it is defining the driver as docker, along with some configuration about what image should be run. Then, lets check out the exec driver here. This looks similar, in that we are defining that we want to use the exec driver, and then jotting down some configuration about the executable that should be run. What is neat about this, is that this is not in a container, this is like telling Nomad that you just want to run a binary on this worker node. So, this is really useful for batch workloads and stuff like that where you have legacy software not yet in containers. Lets look at a few more divers. So, here is the Java driver. This example, is defining that we want to use the java driver, and then the config is defining the jar file that should be run.
task "webservice" {
  driver = "java"

  config {
    jar_path    = "local/example.jar"
    jvm_options = ["-Xmx2048m", "-Xms256m"]
  }
}
You can also get Nomad to orchestrate things like virtual machines too. So, here we are using the qemu driver and defining the virtual machine image that should be run. Pretty cool, right? So, this is why I say that Nomad is sort of similar to other container orchestration software, but different. In that, it is very much a generic task orchestration tool, because you can use it to run containers, binaries, and virtual machines, at the same time, all across a bunch of shared worker nodes.
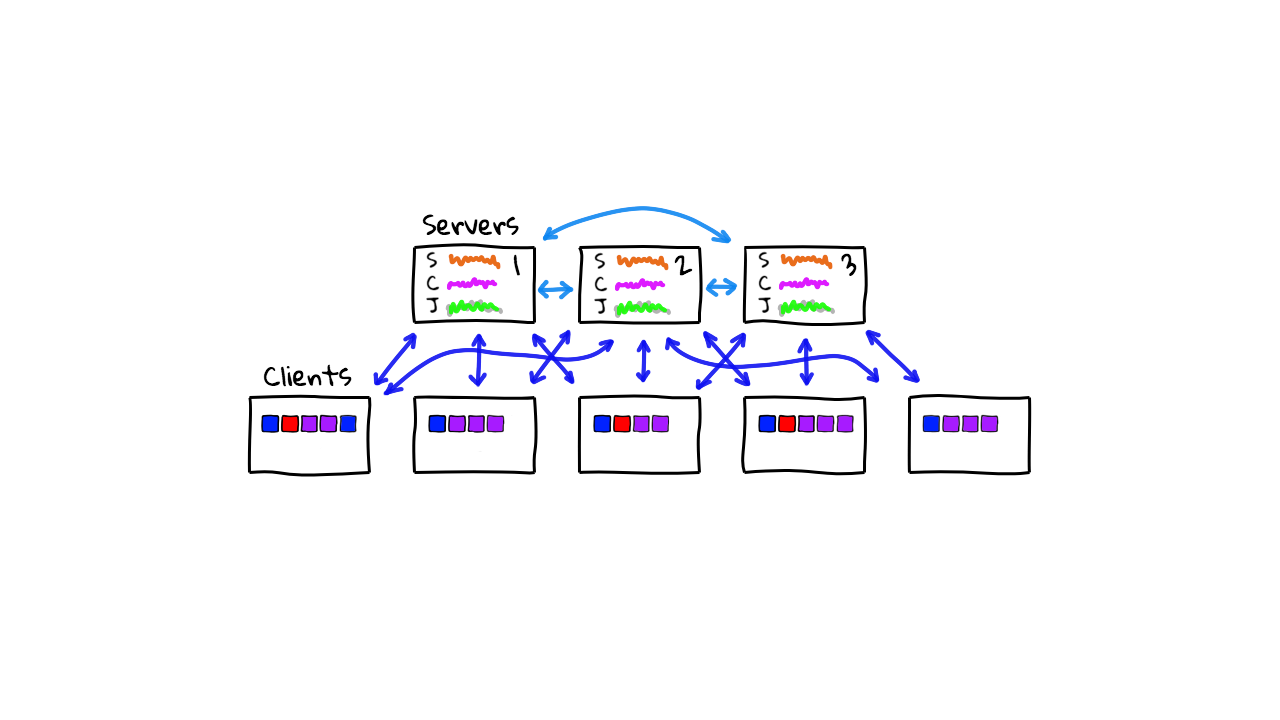
Lets jump back to the diagrams for a minute. So, we have our cluster here, already running our three Redis instances. What happens if we try and schedule a legacy application that is just a simple binary. Well, we define a job using the exec driver and submit it to the cluster. Nomad will look for worker nodes that supports this driver type and schedule the workload there. As I’ll show you in the demo in a minute, Nomad worker nodes can enable supporting task drivers on the worker nodes, by auto detecting supporting software. So, if you have Docker installed on the worker nodes, it will auto detect that, and allow you to send container workloads there. Same goes for Java, virtual machines, etc. Nomad will not install the supporting software for you. So, you need to do that yourself, or using something like configuration management to configure them, for whatever workloads you plan to run there.
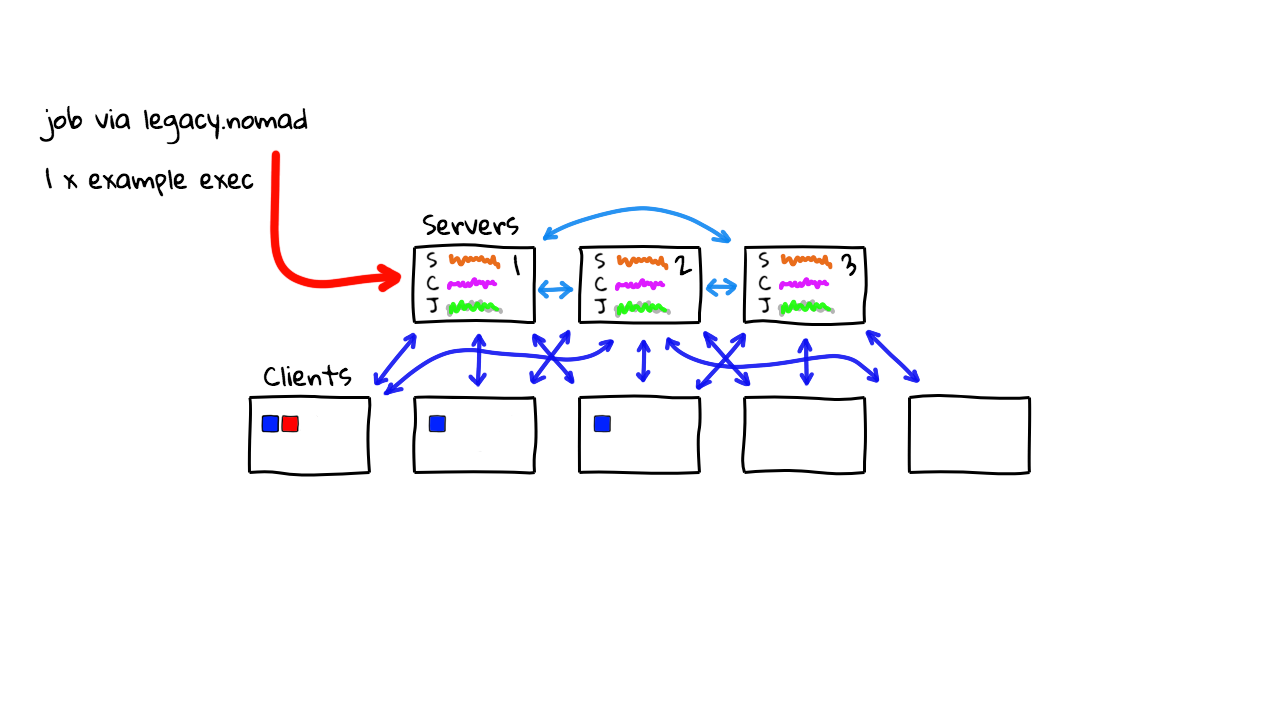
Alright, so lets say we wanted to run some batch workloads too. Well, we create another job, define the driver we want to use, in this case exec, and sent it over to the Nomad API. Nomad will again look for a supported worker and send the job over. This is what makes Nomad pretty unique, in that you can run lots of jobs types, and you just need to install the supporting software on your workers. This make for a pretty flexible system where you can wire up your older legacy applications with a little bit of hacking.
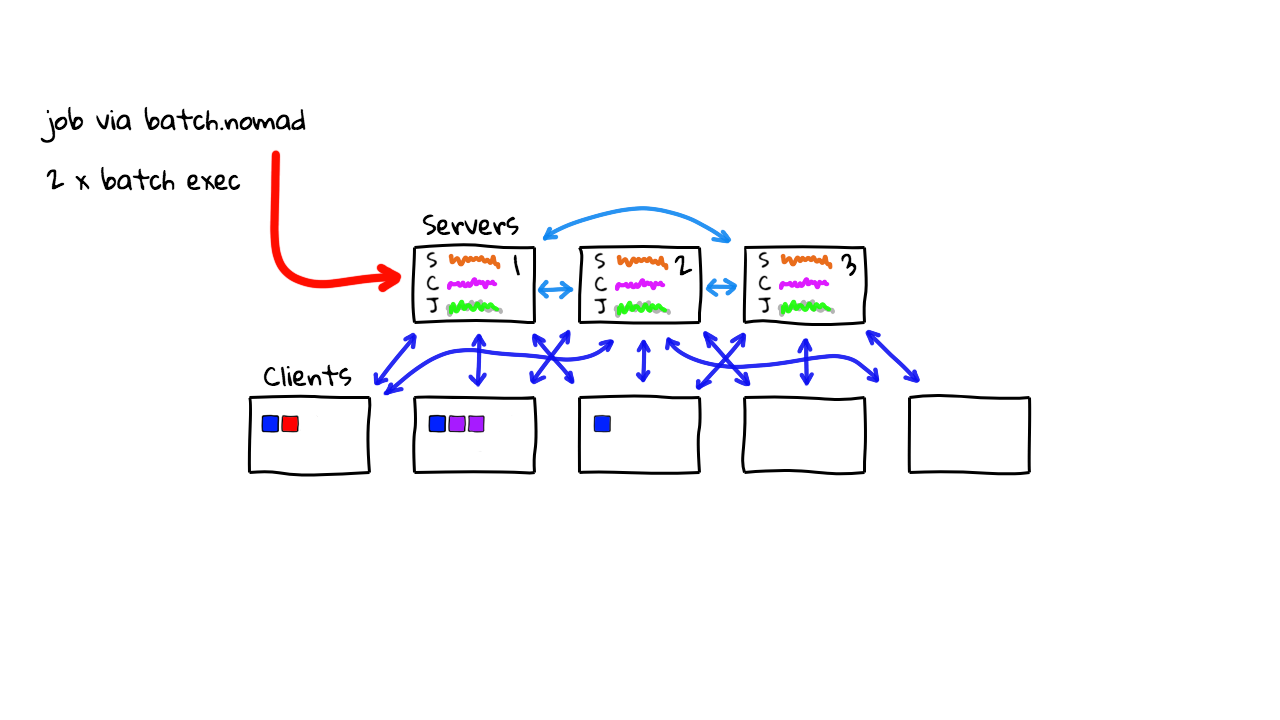
But, there is community driver support too, so that you can create your own task drivers for any type of workloads. So, over time you could have lots of workload types running throughout your cluster, and you just think of these workers as generic compute nodes. Nomad will manage and keep and eye on things for you. So, that is Nomad and generic workload orchestration in a nutshell, basically you can run docker, single binaries via exec, java, virtual machines, and pretty much anything else via custom task drivers you could write. The core idea here, is that you can use Nomad to manage lots of mixed workload types in a pretty generic way. The nice things about this, is that you can now define your jobs and pass them over to Nomad, and it will make sure they get run, or restarted if they fail, and it just looks after all that general operational stuff in a common way.
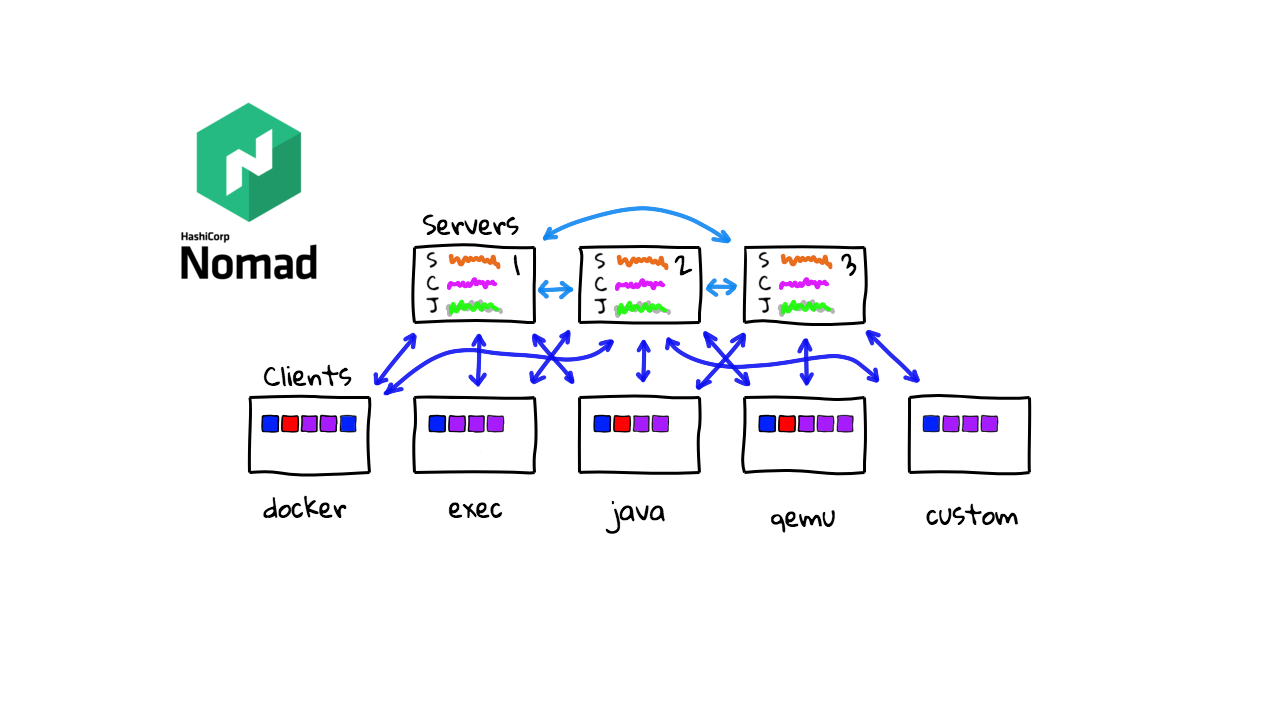
Alright, so lets jump into the demos. So, if you check out the Nomad documentation, there is this Deployment Guide section, that walks you through setting up your first cluster. You have the server nodes up here, that control and keep track of jobs running on the cluster, and then down here you have the worker, or clients nodes, that are actually running the jobs. The docs are a little inconsistent about referring to the worker nodes, as agents, clients, or as just nodes. So, just keep an eye out, since these all mean the same thing, and all these terms refer to the worker nodes were jobs are actually running.
So, I am going to work through this pretty quickly and configure a functional cluster here. What is interesting here. Is that, Nomad is just single binary, for both the clients and servers nodes, and requires no external dependencies, other than supporting task driver software on the the worker nodes. So, to install it on your client and server nodes, you just download the binary, move it into the path, configure init scripts, a deploy some simple configuration files that define Nomad roles. Using these configuration files, you are telling the Nomad binary what type of mode it should run as, either in the server mode, or the client mode. That is pretty much it. So, for the demo today, I thought we would spin up an example cluster, with 3 server nodes, and 5 client nodes, and explore what that looks like.
Alright, so I am using Google Cloud here, but you could easily do this on AWS, Azure, Digital Ocean, Vagrant, etc. We are not using anything fancy here, just spinning up simple virtual machines and installing the software manually to learn. There are scripts for deploying Nomad automatically too, but when I am trying to learn something new, I typically will do it manually the first few times, just to learn about all the dependencies and configuration files. This will help down the road, when something breaks, and I will hopefully remember, that oh yeah, this thing needs that, and it just helps with troubleshooting. But, it does take longer to configure initially.
So, I’ve created 8 virtual machines here, 3 as the master ones, and 5 as the worker or client nodes. These are totally stock images with nothing installed yet, except the base Debian operating system. What I’ll do though, is sort of go through a speedrun of installing Nomad onto all of these machines. I’ll speed this up, but you can at least see the 20 second version of this for each node type, as I chat over what I’m doing. So, lets start installing the server node type first, by connecting to one of these server nodes here. By the way, this is the architecture we are shooting for here, with 3 Nomad server nodes, and 5 worker nodes. Nothing too fancy, but this is pretty similar to what a smaller Nomad install might look like.
Alright, so we are connected. First, I am going to download, unzip, and copy the Nomad binary into a system directory.
wget https://releases.hashicorp.com/nomad/0.9.1/nomad_0.9.1_linux_amd64.zip
unzip nomad_0.9.1_linux_amd64.zip
sudo chown root:root nomad
sudo mv nomad /usr/local/bin/
nomad version
Next, I am going to configure the systemd init scripts so that the operating system knows about Nomad.
mkdir --parents /opt/nomad
cat > /etc/systemd/system/nomad.service
[Unit]
Description=Nomad
Documentation=https://nomadproject.io/docs/
Wants=network-online.target
After=network-online.target

[Service]
ExecReload=/bin/kill -HUP $MAINPID
ExecStart=/usr/local/bin/nomad agent -config /etc/nomad.d
KillMode=process
KillSignal=SIGINT
LimitNOFILE=infinity
LimitNPROC=infinity
Restart=on-failure
RestartSec=2
StartLimitBurst=3
StartLimitIntervalSec=10
TasksMax=infinity

[Install]
WantedBy=multi-user.target
Next, I’m going to create the Nomad /etc directory and populate the configuration files for the server node config. This is pretty simple so far. The only interesting thing in here, is that I am hard coding one of the server nodes IP addresses here. This will allow the server nodes to learn about each other and sync up state as we bootstrap the cluster. You could use service discovery for this too, by having these nodes register themselves, but I am just hardcoding it for this demo.
mkdir --parents /etc/nomad.d
chmod 700 /etc/nomad.d

cat >/etc/nomad.d/nomad.hcl
datacenter = "dc1"
data_dir = "/opt/nomad"

cat > /etc/nomad.d/server.hcl
server {
  enabled          = true
  bootstrap_expect = 3

  server_join {
      # replace with your server ip
    retry_join = ["XX.XXX.X.X:4648"]
  }
}
That’s it, we just need to start the Nomad service now.
systemctl enable nomad
systemctl start nomad
systemctl status nomad
Also, through the magic of video editing, I went through this process on the other two server nodes too, and they are configured now too. So, we should have a working 3 server node cluster now.
root@nomad-server-1:~# nomad server members
Name                   Address     Port  Status  Leader  Protocol  Build  Datacenter  Region
nomad-server-1.global  10.138.0.2  4648  alive   false   2         0.9.1  dc1         global
nomad-server-2.global  10.138.0.3  4648  alive   false   2         0.9.1  dc1         global
nomad-server-3.global  10.138.0.4  4648  alive   true    2         0.9.1  dc1         global
We should now be able to run, nomad server members, and get a listing of our three server nodes. Great, it worked. Also, if I run, netstat -nap, and then we grep for LIST, we should see what ports Nomad is listing on. This port here, 4646 is where the HTTP API and web interface are located. So, I wanted to jump back into the Google Cloud Console and add a firewall rule that will allow me access into this port. This step will depend on what platform you are using. But, the goal here is to allow network access from my machine into the Nomad cluster on port 4646. I’m just going to add this ingress firewall rule, that allows traffic from my IP address into any machines in my network, on port 4646. You would probably want to lock this down more, but for this quick demo, this is more than enough. Alright, so lets connect to one of our Nomad server node IP addresses on port 4646 in a browser.
root@nomad-server-1:~# netstat -nap|grep LIST
tcp6       0      0 :::4646                 :::*                    LISTEN      1795/nomad
tcp6       0      0 :::4647                 :::*                    LISTEN      1795/nomad
tcp6       0      0 :::4648                 :::*                    LISTEN      1795/nomad
So, here is the web interface. You can see there is three main areas, jobs, clients, and servers. We have not submitted any jobs yet, there are no client worker nodes either, so we can only explore the server nodes for now. You can see our three node cluster right now. If we click in here, this is pretty much the same information that was shown at the command line earlier. Nothing too crazy in here.
But, lets jump back to our virtual machines for a minutes, and do a speedrun of installing the client worker nodes. I am just going to show you a sped of version of installing one of them and then do the others behind the scenes. The process looks very similar to installing the server nodes, only that we change a Nomad config file, saying that we want to run in a client mode vs the server mode. So we connect. First, download, unzip, and copy the Nomad binary into a system directory.
wget https://releases.hashicorp.com/nomad/0.9.1/nomad_0.9.1_linux_amd64.zip
unzip nomad_0.9.1_linux_amd64.zip
sudo chown root:root nomad
sudo mv nomad /usr/local/bin/
nomad version
Again, I am going to configure the systemd init scripts so that the operating system knows about Nomad.
mkdir --parents /opt/nomad
cat > /etc/systemd/system/nomad.service
[Unit]
Description=Nomad
Documentation=https://nomadproject.io/docs/
Wants=network-online.target
After=network-online.target

[Service]
ExecReload=/bin/kill -HUP $MAINPID
ExecStart=/usr/local/bin/nomad agent -config /etc/nomad.d
KillMode=process
KillSignal=SIGINT
LimitNOFILE=infinity
LimitNPROC=infinity
Restart=on-failure
RestartSec=2
StartLimitBurst=3
StartLimitIntervalSec=10
TasksMax=infinity

[Install]
WantedBy=multi-user.target
Next, I’m going to create the Nomad /etc directory and populate the configuration files for the client node config.
mkdir --parents /etc/nomad.d
chmod 700 /etc/nomad.d

cat >/etc/nomad.d/nomad.hcl
datacenter = "dc1"
data_dir = "/opt/nomad"
This is pretty simple so far. The only interesting thing in here, is that I am hard coding one of the server nodes IP addresses here. This is so that the client worker nodes know how to get in touch with the Nomad server nodes.
cat > /etc/nomad.d/client.hcl
client {
  enabled = true
    # replace with your server ip
  servers = ["XX.XXX.X.X:4647"]
}
If this were a real production systems, you would typically be using configuration management here to install these nodes, and using some type of service discovery systems rather than hard coding. Alight, we just need to start the client node now.
systemctl enable nomad
systemctl start nomad
systemctl status nomad
Again, through the magic of video editing, I have installed the other 4 client worker nodes too. So, we actually have a real demo cluster that looks like our diagram now. All of our Nomad server nodes are up and running along with our client worker nodes. Lets jump back to one of the server nodes consoles, and verify it can see the client nodes, by running, nomad node status. As you can see, we have our 5 client worker nodes now. Pretty cool. Lets jump over to the web interface now and see how that changed.
root@nomad-server-1:~# nomad node status ID DC Name Class Drain Eligibility Status 3af62637 dc1 nomad-agent-2false eligible ready ea48adc0 dc1 nomad-agent-3 false eligible ready 8bbe77b9 dc1 nomad-agent-4 false eligible ready ed9624b7 dc1 nomad-agent-5 false eligible ready d7518d70 dc1 nomad-agent-1 false eligible ready
Great, so like before we have our 3 server nodes here, but now the client node section is populated with our 5 workers. Lets click into one of these and have a look. So, there is some simple client details here, along with some cpu and memory graphs. Some of this will come alive once we deploy a few example workloads. But, the thing I wanted to focus on here, is this driver status listing here. You can see we only have the exec driver enabled. The reason, is that I only install a vanilla virtual machine, and then installed Nomad on it. So, if you wanted to enable a few of these drivers you would have to install the supporting software yourself and Nomad will auto detect it. Like, installing Docker on the machine, Java, or maybe qemu. So, again, through the magic of video editing I’m going to install Docker on these. By the way, I’m using this tutorial here, and I’m just adding the docker repo, and installing the docker community edition. Cool, so I’ve done that, and reloaded all the Nomad client agents, and lets go and check our nodes again. Cool, so you can see the Docker driver is now enabled. I guess the point I am trying to make here, is that Nomad is pretty generic, and not super opinionated about things. So, you can configure Docker how you want, and it will just deploy workloads to it. This is a strength I think, in that if you have something very customizable, and you can totally get Nomad to work the way you want. My personal opinion here, is that lots of the focus is on kubernetes these days and there are tons of tutorials around it. So, if you are looking for something a little more mainstream and opinionated, and don’t need this general task orchestration, you might just be better off using a managed container offering from a cloud provider vs Nomad. But, there are pros and cons to everything.
Alright, so lets go and deploy a workload to our cluster via the console. So, I’m connected to one of the server nodes here, and going to run, nomad job init. This will create a skelton example.nomad job file with a default configuration.
nomad job init
Example job file written to example.nomad
Lets quickly have a look through it. So, you can see tons of comments in here which is really nice. Next, you can see our job block here, then we are defining a task to be run within our job. We are using the docker driver, asking to run a redis container, with this config. Next, lets just quickly check the rest of this example file. So, you can define resource constraints too, say for example that you wanted to limit the amount of cpu or memory a task can consume. Finally, you can ask Nomad to register this job with a service discovery system, so that you can route traffic over to it. But, you would need to roll your own load balancing, as Nomad doesn’t support this out of the box.
Alright, so lets deploy this example nomad job into the cluster, by running, nomad job run example.nomad.
nomad job run example.nomad
==> Monitoring evaluation "f5763fbd"
    Evaluation triggered by job "example"
    Evaluation within deployment: "a4fe6f0d"
    Allocation "5902109b" created: node "8bbe77b9", group "cache"
    Evaluation status changed: "pending" -> "complete"
==> Evaluation "f5763fbd" finished with status "complete"
Cool, looks like it worked. Then, you can inspect the job by running, nomad status example. This will tell you key information, like job health, and how many instances you are running, and their status.
nomad status example
ID            = example
Name          = example
Submit Date   = 2019-05-06T17:21:13Z
Type          = service
Priority      = 50
Datacenters   = dc1
Status        = running
Periodic      = false
Parameterized = false
Summary
Task Group  Queued  Starting  Running  Failed  Complete  Lost
cache       0       0         1        0       0         0
Latest Deployment
ID          = a4fe6f0d
Status      = running
Description = Deployment is running
Deployed
Task Group  Desired  Placed  Healthy  Unhealthy  Progress Deadline
cache       1        1       0        0          2019-05-06T17:31:13Z
Allocations
ID        Node ID   Task Group  Version  Desired  Status   Created    Modified
5902109b  8bbe77b9  cache       0        run      running  2m36s ago  2m31s ago
Alright, so we are running a single instance right now. Lets modify the example.nomad configuration file and change that to 3 redis instances. By, changing the count to 3 here, and then saving the config file.
Back at the command line, you can use the, nomad job plan example.nomad command, to ask Nomad to read in the updated config file and tell you what changes will happen. This is a pretty cool feature, that is sort of similar to when you are using terraform, in that it will tell you what is about to change. So, you can see our instance counts will change here, from 1 to 3.
Alright, so now lets run, nomad job run example.nomad, to deploy this. So, we should be running three instances of redis now. But, nomad doesn’t have any built in load balancers, or anything like that, you are totally left to figure this out yourself. This isn’t necessarily a bad thing, just that it is a little less opinionated about how you do things. So, this gives you tons of flexibility over something like kubernetes, but also might not be complete enough for many people.
So, we should have our three redis instances running now. Let jump back to the web interface and have a look. So, you can see we now have our example job displayed here. You can see all the instance counts and all that type of stuff. Everything you see here can also be accessed at the command line too. Also, if you check out the client worker nodes you can see some of the instances running on them now, this might be useful for checking worker node load and things like that.
So, that’s a container use-case. But, lets jump back the the command line and deploy a simple executable job that is not running in a container, and deploy that out to these nodes. So, I’m just going to paste a simple nomad config, using the exec driver, running the sleep command. We are going to run 5 instances of this job across our cluster.
cat >legacy.nomad
job "legacy" {
  datacenters = ["dc1"]
  group "sleepy" {
    count = 5
    task "sleep" {
      driver = "exec"
      config {
        command = "/bin/sleep"
        args    = ["1000"]
      }
    }
  }
}
One thing here, is that since this isn’t running in a container, you need to make this executable exists on the client worker node machines. So, you will get into a situation of installing lots of dependencies on worker nodes if not using containers.
nomad job run legacy.nomad
==> Monitoring evaluation "e6465b30"
    Evaluation triggered by job "legacy"
    Allocation "9cfbe62c" created: node "3af62637", group "sleepy"
    Allocation "ae7e27ba" created: node "d7518d70", group "sleepy"
    Allocation "c116468f" created: node "8bbe77b9", group "sleepy"
    Allocation "ca7221f4" created: node "ed9624b7", group "sleepy"
    Allocation "ede85fea" created: node "ed9624b7", group "sleepy"
    Evaluation status changed: "pending" -> "complete"
==> Evaluation "e6465b30" finished with status "complete"
But, the sleep command is very common so this should just work. Alright, lets deploy this, using the nomad job run legacy.nomad command. Great, so we should have this deployed now. Lets jump back to the web interface and have a look. Great, so we can see the second job now, and if we check in here we can see our instances running. Pretty cool right?

So, this sort of gets us back to this diagram, of our Nomad cluster running mixed workloads. You can run containers, binaries, java programs, etc, all across a single cluster and Nomad will look after all the gory details. So, that is pretty much a quick tour of Nomad and some of the cool features that make it unique, and sort of a more generic workload orchestration tool, vs the container only tools out there.
Alright, that’s it for this episode. Thanks for watching. I’ll cya next week. Bye.