- RabbitMQ and RabbitMQ Tutorials
- Documentation, Queues, Consumers, Monitoring, and Production Checklist
- RabbitMQ - Docker Official Image
- CloudAMQP Lessons Learned | Youtube
- Celery - Distributed Task Queue and Docs
- Scaling Instagram Infrastructure | Youtube
- The Evolution of Reddit.com’s Architecture | Youtube
- Reddit - How We Built r/Place
- How Slack Works
- Scaling Slack’s Job Queue
- jweissig/59-fun-with-rabbitmq | Github
In this episode, we will be checking out RabbitMQ which is a very popular open-source message broker. You can think of this sort of a crash course on the topic. By the way, RabbitMQ, or Rabbit Message Queue, is also referred to as just Rabbit, so I will be using these terms interchangeably throughout the episode.
I thought it would be cool to check this topic out since many companies are using this tech behind the scenes. Chances are, you even used a website that is running RabbitMQ behind the scenes today, without even know it. This topic sort of straddles the middle point between development and operations. In that, you might have develops using this system, but you will typically have ops supporting it. So, it is a really useful topic for both groups to know about.
Lets set the landscape for this episode by walking you through problem scenario. Sort of show you some latency and infrastructure scaling issues that you might run into and then explain how RabbitMQ can help you deal with them.
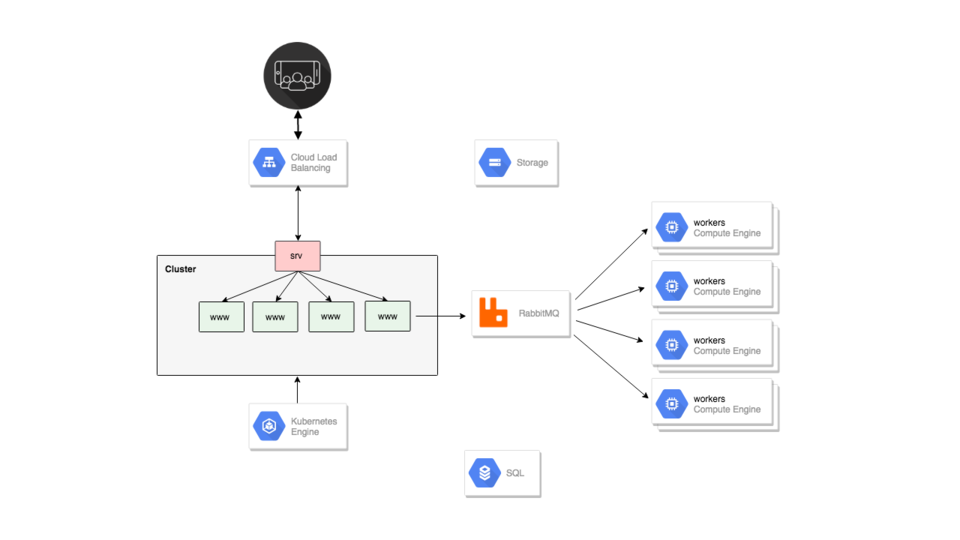
Here is an example architecture diagram for a website deployed in the Cloud.
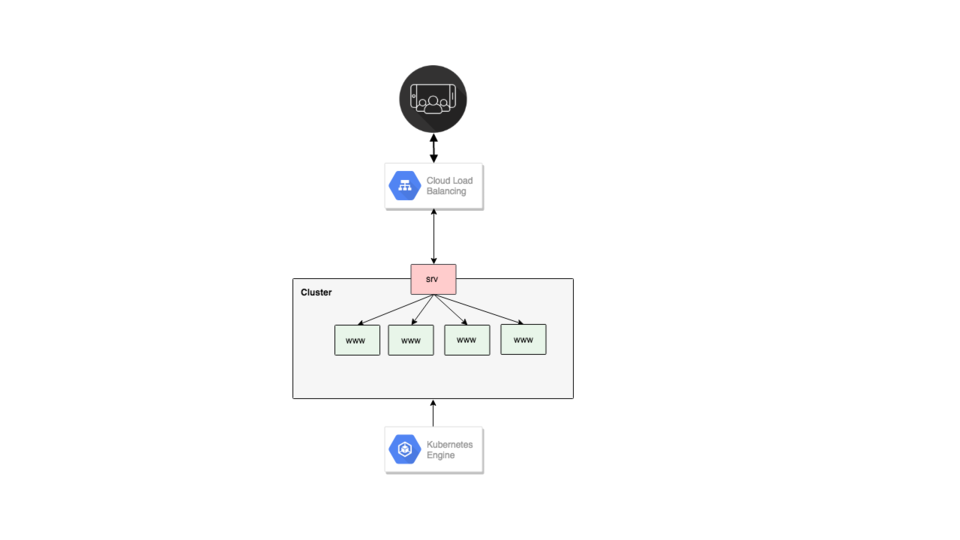
We have users up top here, and their web requests flow through our front end load balancer and connect into our web servers, hopefully getting a pretty quick response within a few hundred milliseconds.
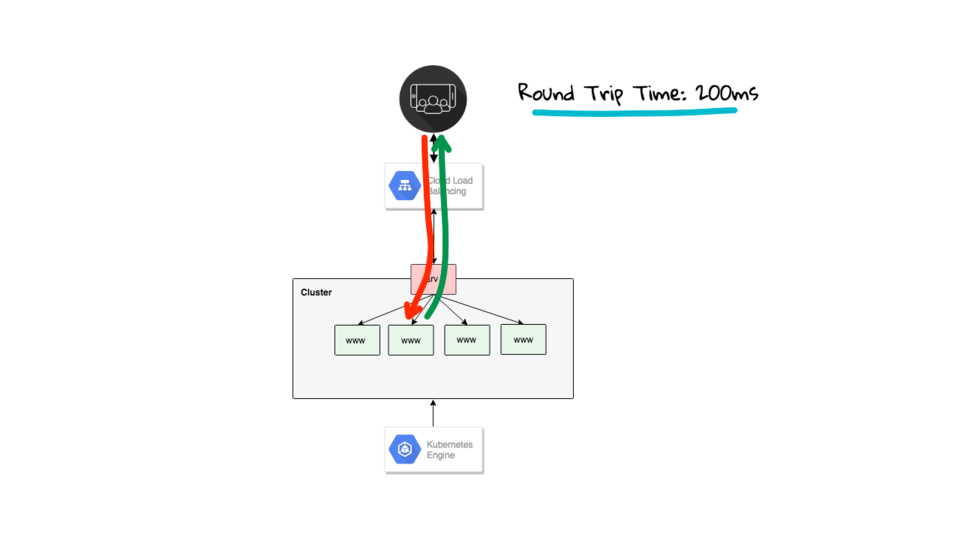
However, there exists a problem here as not all web pages are created equal. Often times, we need to run tasks on the web server in response to a user request or action, this sometimes takes many seconds to complete. For example, you will often need to send email in response to an order, new account, or password reset. What about updating someone’s comment karma count where we need to process all their comments. Or, maybe we are processing user video uploads. How about calculating comment counts across users while checking for spam? Finally, what if we need to fetch an external url or API in response to a user request? These are all good examples of things that could be blocking a user request adding many seconds to their request.
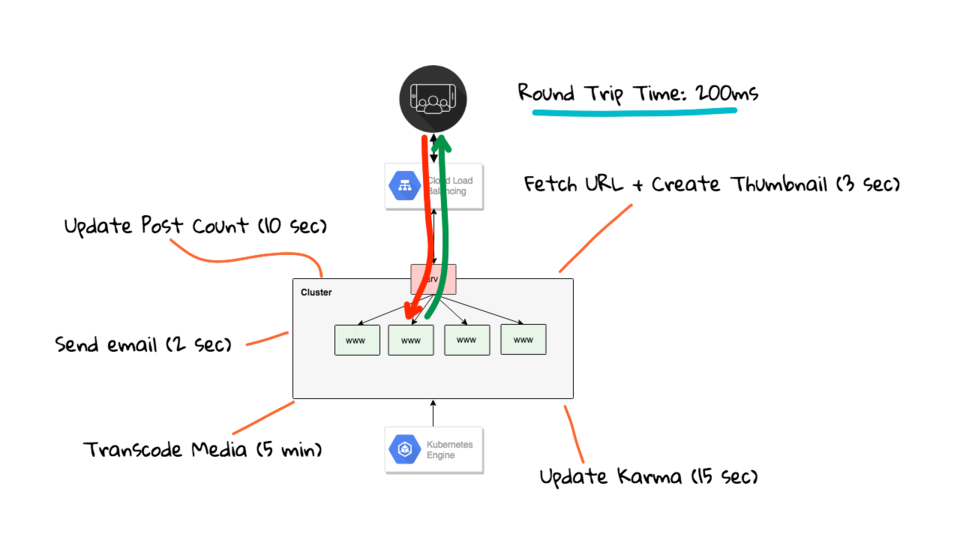
I consider user requests time sensitive, and strive to remove non-essential code that might slow this critical path down. For example, I am sure you would be pretty ticked off, if every time you were on Reddit and reloaded a page, if it took 30 seconds to load. What about, booking a hotel, or flight somewhere. You expect these sites to be fast or might shop elsewhere.
So, how do we do this type of stuff without making the website feel slow? Well, one way is to have a background work queue, where your web tier can pass off non-critical tasks for background processing, rather than making users wait around. These tasks are still important, and need to be done, but they do not need to be blocking the users request. This task handoff often happens through a message broker like RabbitMQ. You have probably seen this yourself while doing online shopping. You placed an order, the page returns saying your order was completed, and then a few moments later you get an order confirmation email. Often times this will be processed via a deferred task like this. This pattern generally makes for a much better user experience too.
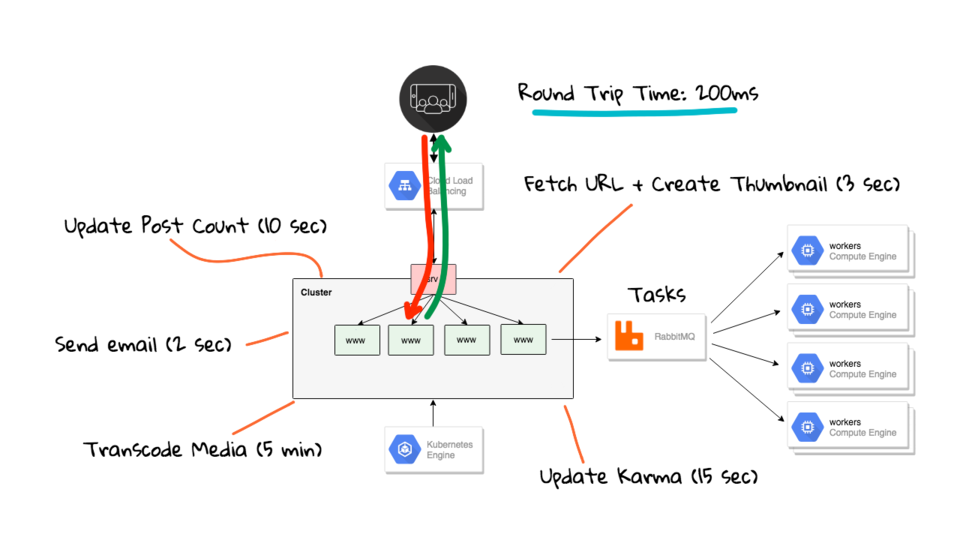
But, do not take my word for it. Let me prove it to you. Here are a few reference links about how companies like Instagram, Reddit, and Slack are using Message Queues behind the scenes to implement this worker queue pattern. This talk on Scaling at Instagram is pretty good and mentions they are using RabbitMQ for tons of these types of things. I think at one point they mentioned they have 20 thousand severs. You can sort of imaging all the image processing, comments counting, notifications, etc, that they have to deal with. Next, there is Reddit and they mention how they build comment threads out, count Karma, and lots of spam checking happens by way of these background worker queues. Most of these events are triggered by user interactions on the site but it still feels very speedy. Here is another link about some Message Queue war stories at Reddit for an April Fools event. Next up, there is Slack, but they are not using RabbitMQ, they have built something around Redis. However, it is a pretty interesting talk, where they go into detail about how when you post a website link in chat, behind the scenes they are using a message queue to fetch that website, get a description, generate a website thumbnail, and finally posting that website summary block back into chat. Pretty cool. So, if you are interested, I would recommend checking these links out. Slack also posted a pretty detailed blog about their setup too. The technology barrier to doing something like this is pretty low as I will show you in the demos. This is not something only big companies can use.
Alright, hopefully I have you convinced you this is a useful tool. Chances are, you are not going to be doing this type of stuff every day, but when you run into these types of problems you will hopefully be reminded of Rabbit and Worker Queues.
Lets jump back to the RabbitMQ site for a minute. I wanted to call out these awesome RabbitMQ Tutorials as they walk through a bunch of scenarios for how RabbitMQ can be used. From work queue, to pub/sub, then routing, topics, and RPC. I am just going to focus on the worker queue use-case today as that is very popular. You can even see they have each tutorial coded in many popular programming languages too. The documentation is fantastic and I highly recommend checking these out.
Before we jump into the demos, I wanted to walk through four key concepts about RabbitMQ. I have put together a few diagrams that will hopefully help explain them.
First, RabbitMQ is server software running the AMQP or Advanced Message Queuing Protocol, and it sits on your network and lists on TCP port 5672. The RabbitMQ server is pretty battle tested, in that it also supports clusters, and other advanced features like that. But, it is still super simple to install and use. I find it very well rounded.
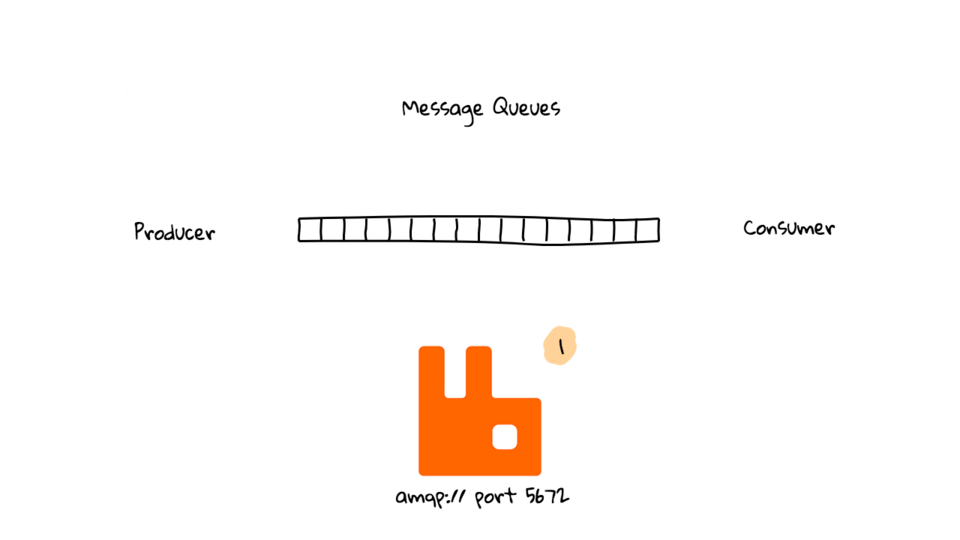
Second, RabbitMQ is a message broker that accepts and forwards messages based around queues. Each queue will also have a name, for example task_queue, or something like that. Clients will connect RabbitMQ and ask to store or retrieve messages from queues. This is the main function of this server application.
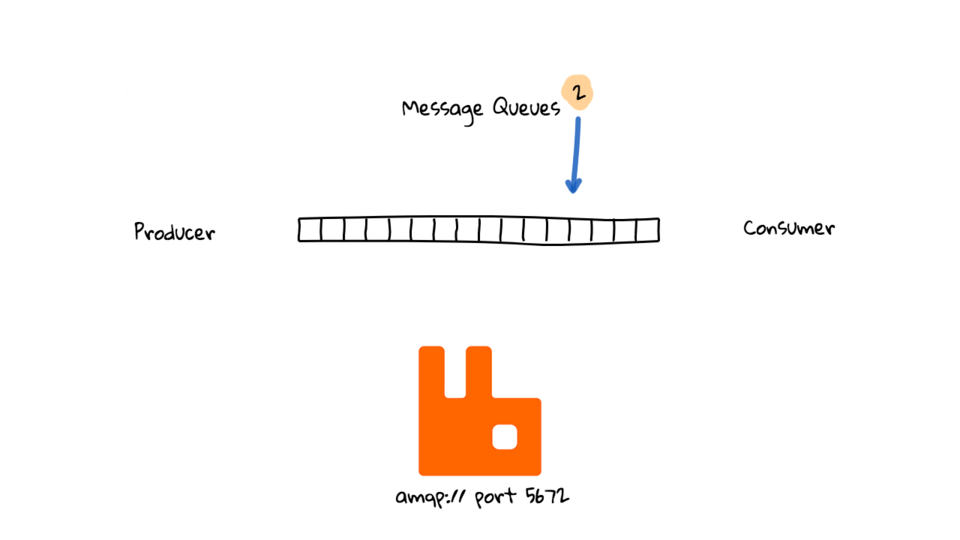
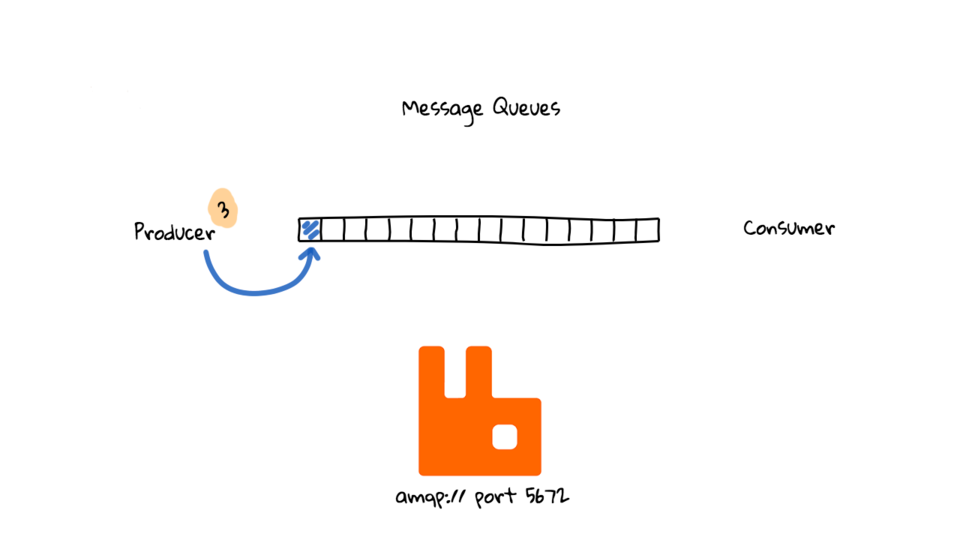
Third, you will see the term Producer or Publisher mentioned often throughout the docs. Basically, these are clients that would connect to RabbitMQ and ask to store a message in a particular queue. I think about this very much like you would connect and ask a database to store a particular record.
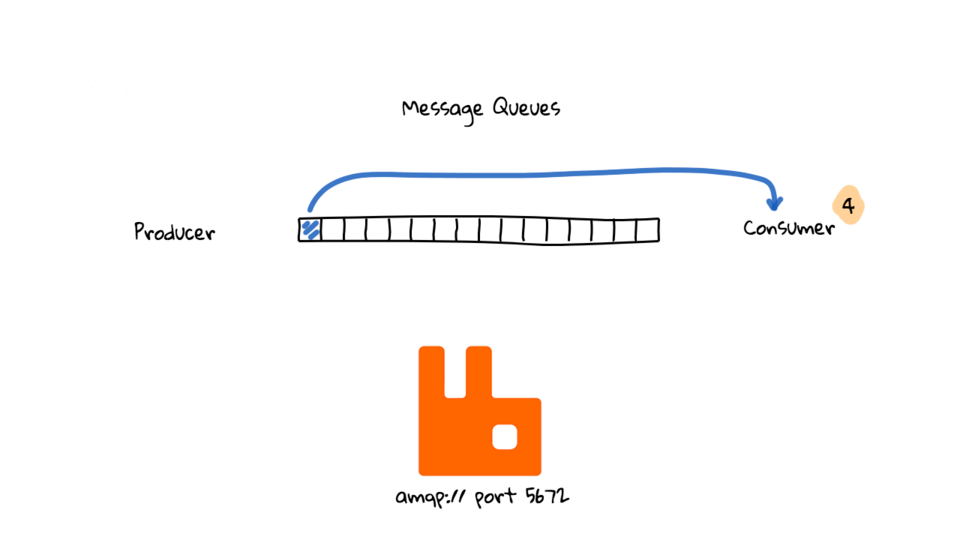
Fourth, you will see the term Consumer too. These are clients that connect to RabbitMQ and ask for messages stored in a Queue. After the Consumer asks for the message it typically removes this from the queue. So, messages in a queue are very transient and just meant for passing messages from Producers to Consumers of the message.
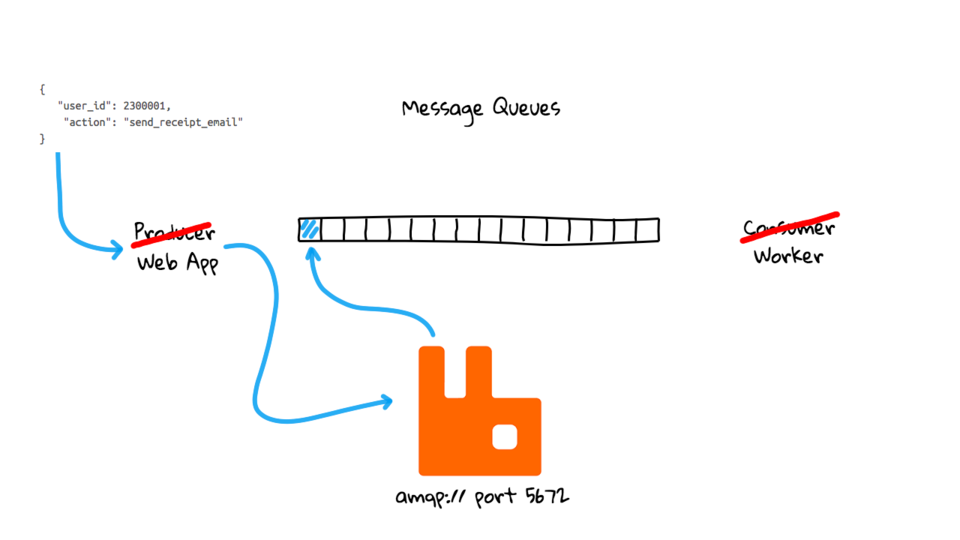
Alright, now that we covered the basics, lets work through a more real world example here. Lets say you are running an online store and you are constantly sending out customer order receipt emails. You are running all types of database queries for checking inventory, payment status, suggesting other items the customer might like, calculating shipping details, etc. This takes 5 seconds to run. So, you want to push this into the background as it might take some time to complete and do not want to hold the user up.
In this scenario, we can replace the message Producer here with a Web App. We can also replace the Consumer here, with a Worker node that will actually be pulling this data together and sending out the completed order email. I just want to make it totally clear, RabbitMQ is only server software, you are totally responsible for creating the Producer and Consumer clients.
So, here is how might this flow, we have a customer Order that was just placed on the website. You can see we generated a little JSON message with the User ID and Action. This message totally arbitrary, you can create messages in whatever format you want, and RabbitMQ will store them in a queue. They can be plain text, JSON, or something else. I just used JSON as that is typically what you might see. This order event triggers a call within your web app to send an email receipt. From there, our web app makes a call to RabbitMQ, and puts a message into the receipt message queue. Then our web app closes down the connection to RabbitMQ and we now have a single message sitting in the queue waiting to be processed.
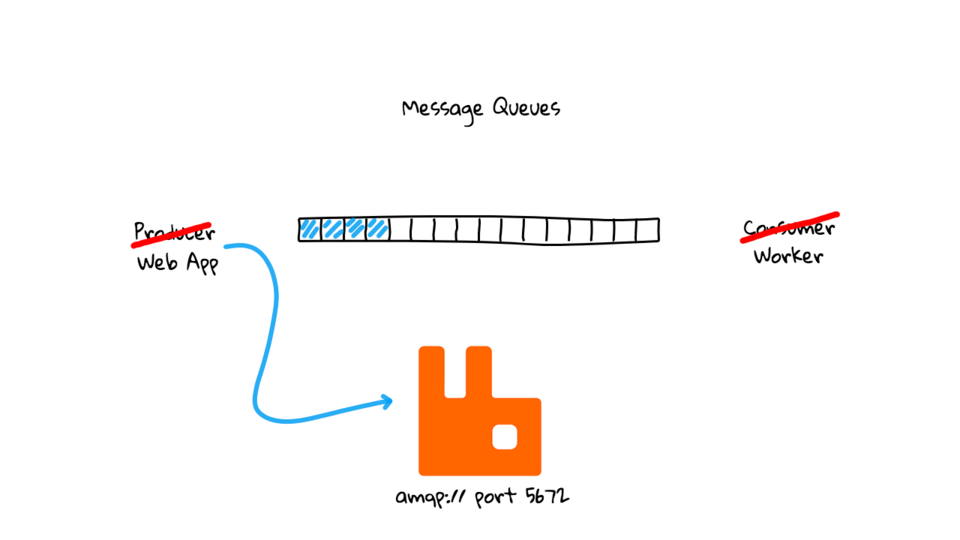
Another order comes in, again we repeat the same process by connecting to RabbitMQ and putting a message into the queue, then close it all down. Well, that is a little inefficient if we are constantly going to be opening and closing connection if we know there is going to be a steady stream of orders. So, you will often see persistent open connections to Rabbit from these message Producer applications. Just like your web app might have open connections to your database you would do the same for Rabbit. Then you can easily send messages over to Rabbit without constantly opening and closing things. Now, when we put a few more messages into the queue it will actually be a little quicker since we already have an established connection. It is very common to see hundreds of open connections on a Rabbit box, both for Producers sending in messages, and Consumer nodes waiting for messages.
Alright, so that covers how messages arrive into the queue. But, how do worker nodes get them? Well, it is pretty much the same process just in reverse. This time our worker node is going to connect to Rabbit and ask for messages in our queue. Rabbit will grab the first message in that queue and pass it back to the worker, where the worker will process the message, based on what you programmed it to do, and send out the email. Again, you would need to program this worker logic, so it is totally customizable to your environment. The cycle will repeat for each message here. Queues follow the First In First Out ordering, where the oldest message is processed first. Again, the worker will typically have a persistent connection here too.
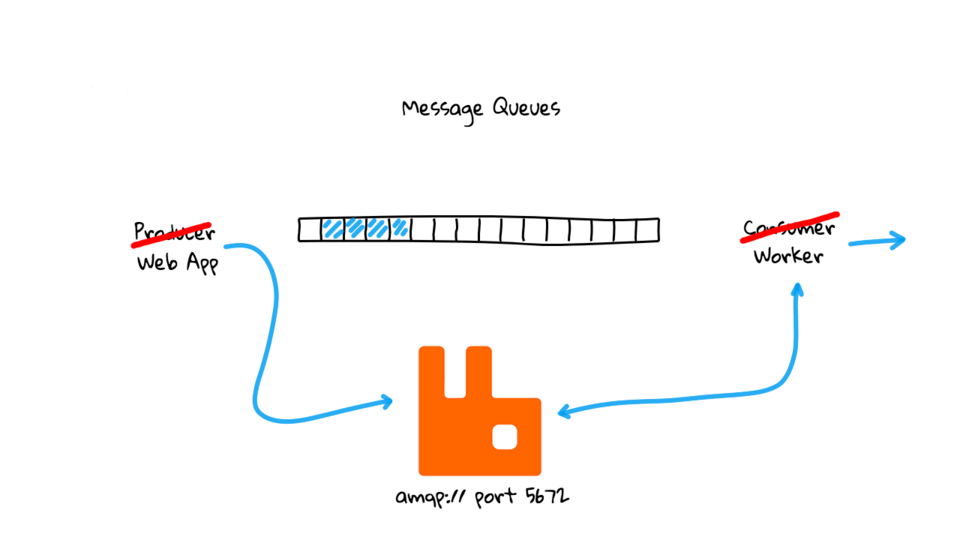
For demonstration purposes only, I did not show both producers and consumers working at the same time here. But, in reality, both these things would be connected at the same time and messages would be flowing in and out pretty quickly.
This example was pretty simple so far. The reality is that you would likely have many queues for the different message types you want to process.
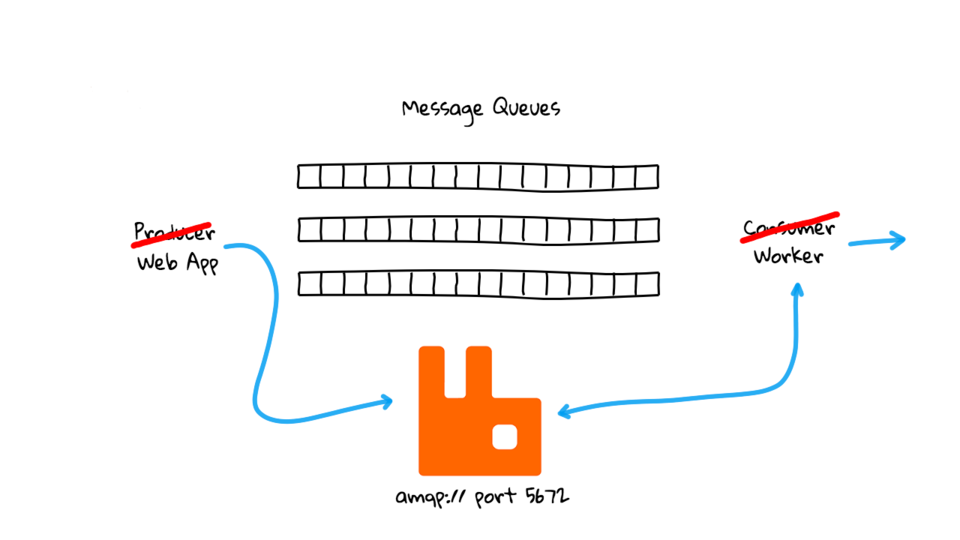
You would also have lots of producers generating messages into these queues.
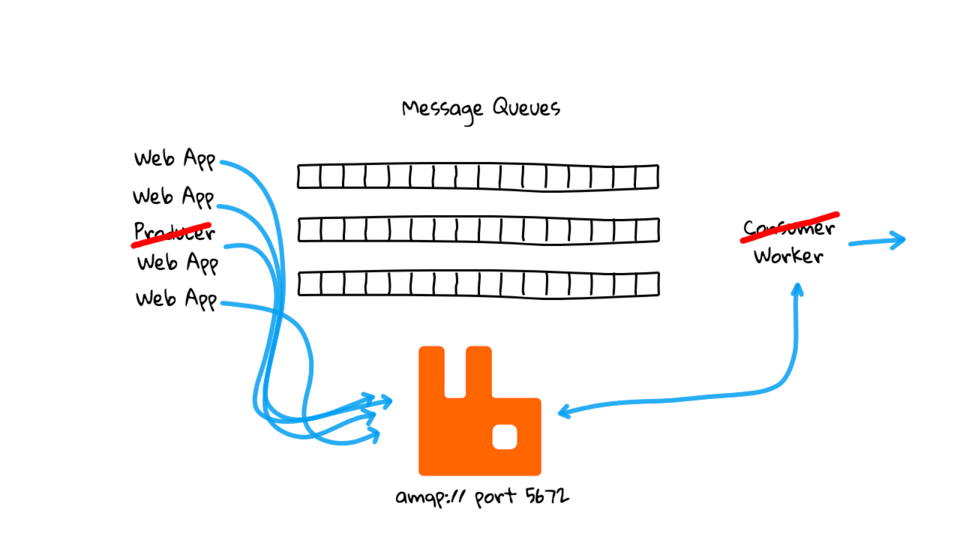
Then you would also have lots of workers connected waiting for messages in the queues they are consuming messages from.
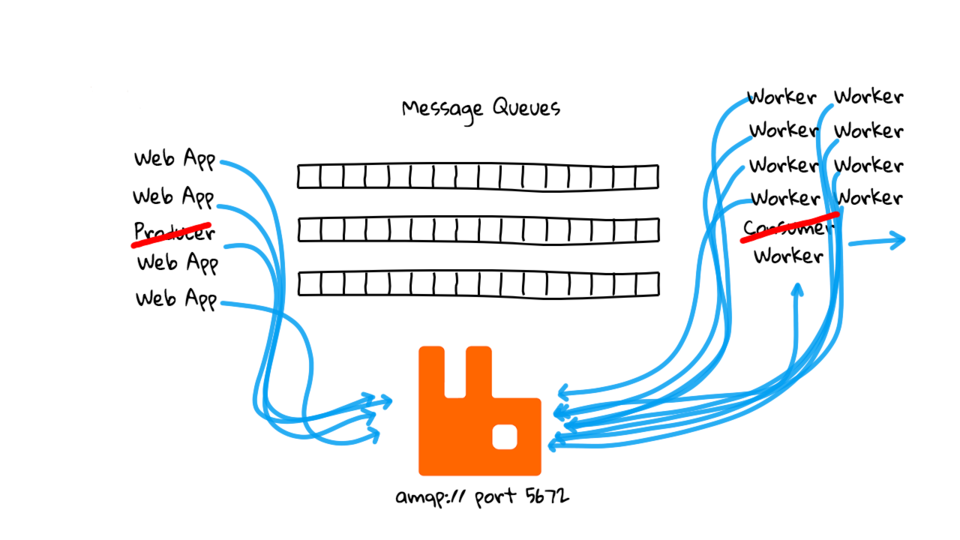
Typically, you also want to have the queues running as close to zero messages as possible. You would be scaling up and down the worker nodes to sort of match the incoming rate of messages sitting in the queue. This is not an exact science, as each job type of probably different, and will complete in different times. For example, sending an email might take a second but transcoding a video file might take many minutes. So, you sort of need to look at the job type and scale your worker nodes as you see fit. This is where monitoring queue length is super important as you might need to scale up your worker node count to drain the queue. Worker monitoring in general is super important here too in that you want to make sure jobs are actually completing successfully.
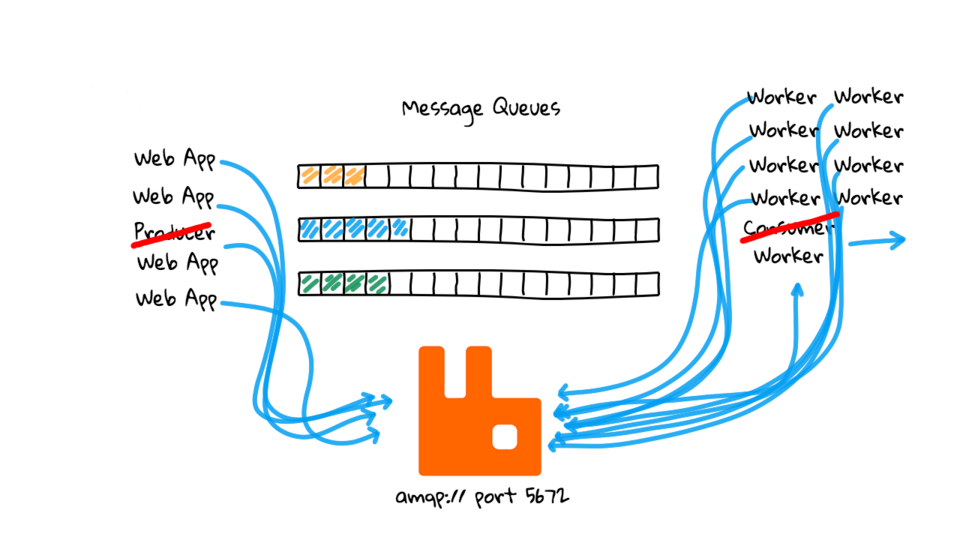
This architecture does allow for some cool operational things too. Not only are you speeding up user requests by taking advantage of background processing. But, you are also decoupling your frontend code from your backend code. So, your frontend could be written in one language and your backend workers in another (maybe for performance or convenience reasons). Another really great advantage, is that these queues can act as sort of a buffer or shock absorber for your systems. What I mean, is that say you have a huge influx of orders and the queues start to back up, nothing is lost you just have a backlog now. This is mostly hidden from user traffic and things continue like normal as you work down the queue in the background. Where as, if you were doing things in real-time your system might be overloaded. So, now you have a way to dealing with larger influxes of traffic. Also, say you discover some critical backend problem. Maybe you just shut off all worker nodes for a bit and fix it. The task messages will just queue up for when the workers are online again accepting jobs. This strategy can buy you time and often goes unnoticed to users. Obviously this is highly dependant on your architecture and what you are using it for but these are some things to think about. To me, this is a major bonus of using something like this because just speeding front end user requests up, it just adds some operational flexibility.
Alright, so that is likely enough theory, lets jump into the demo. These RabbitMQ tutorials are pretty good as I already mentioned and worth working through if you are at all interested in this. Basically, for the demos today, we are going to setup a RabbitMQ server, and then run through a simple hello world example to prove things out, and then look at something with multiple workers.
There are a bunch of install guides you can follow for how to get started with RabbitMQ. I am going to be running the RabbitMQ from Docker today on my Mac. You can find the Official Docker Images here. By the way, I have put all these links in the episode notes below. If you go the Docker route there is load of good examples on this page.
Lets jump over to the console and have a look at the two examples we will be running through today. I have posted this code up on Github too if you wanted to have a look. Alright, so there is a simple hello world example using a single message producer and a single message consumer. In the second demo, we will look at how running multiple worker works.
So, here is the docker command that I am going to be using to fire up the RabbitMQ server. Docker run, expose the ports for the message service and management interface, and then the image name. I am just running this on my local network so I am not worried about security too much. You would definitely want to read through the docs if you were doing this in production as you would want to lock this down. Lets just verify it is actually running too. Looks good.
$ ls -l
drwxr-xr-x  4 jweissig  staff   128  5 Mar 19:51 01_hello
drwxr-xr-x  4 jweissig  staff   128  4 Mar 23:55 02_wordlist
-rw-r--r--  1 jweissig  staff  1121  6 Mar 12:55 README.md
$ docker run -d -p 5672:5672 -p 15672:15672 rabbitmq:3.6.6-management
Unable to find image 'rabbitmq:3.6.6-management' locally
3.6.6-management: Pulling from library/rabbitmq
693502eb7dfb: Pull complete
7eb18686cc46: Pull complete
ae00e0021d4f: Pull complete
9c40b0d0b2a9: Pull complete
2fb8e146207a: Pull complete
3d218990416b: Pull complete
e6a2b2fe78c0: Pull complete
fe9045f6bf09: Pull complete
2811fbe50640: Pull complete
34de23e5443b: Pull complete
57fc62f25d65: Pull complete
130407bb1e30: Pull complete
861305534fee: Pull complete
166ee531bc38: Pull complete
bdc4fbb675c6: Pull complete
Digest: sha256:60fa2366e203f1515b99082c4a2f3dcb157d836eacedb31dfdeb97d3fd9dd1ee
Status: Downloaded newer image for rabbitmq:3.6.6-management
40e6b32c0d721cf673b8a2afb94cd1e1aea87043e95f24df3ff2ee131827bdf3
$ docker ps
CONTAINER ID        IMAGE                       COMMAND                  CREATED             STATUS              PORTS                                                                                        NAMES
cbc9e5e7860a        rabbitmq:3.6.6-management   "docker-entrypoint.s…"   4 seconds ago       Up 3 seconds        4369/tcp, 5671/tcp, 0.0.0.0:5672->5672/tcp, 15671/tcp, 25672/tcp, 0.0.0.0:15672->15672/tcp   modest_sinoussi
One nice thing, is that I used the Docker image that contains the management interface. So, we can connect to the RabbitMQ via a web browser and it is pretty helpful for getting a idea of what is happening when you are first starting out. You can access it via localhost port 15672. I am going to login with the username guest and the password guest.
Alright, now we get this overview page with a summary of what is happening on this RabbitMQ server. This will show all our queues, messages queued up, node metrics, etc. There is also a few tabs here where we can drill down, this queue tab will some in pretty handy once we send some messages over. That is basically it.
Lets jump over to an editor and check out our example message producer and consumer clients. In the hello directory here you can see our two clients. Lets review the producer first. I chose the go programming clients since that is what I have been using lately but there are tons of examples so you could pick one what you are more familiar with on the RabbitMQ tutorials site. The client is pretty straight forward, first we are connecting to the RabbitMQ server, we open a channel, then we define a queue, called task queue. Next, we define a message we want to put into that queue, in this case “hello world”. Finally, we publish that message to the queue. That is it. Pretty simple. If this where you web server and you were passing over messages you might encode it in JSON or something and have a much of key/value fields that you workers would need to process the job but this is a good proof of concept for now.
Next, lets check out the message consumer, or what our worker nodes might be running. Here, we follow a similar pattern. We connect to the RabbitMQ server, open a channel, define the task_queue again. You can define the same queue over and over this is not destructive if there are existing messages. This is more of a safety measure to make sure the queue exists that we are expecting to read messages front. Finally, we say we want to consume messages in that queue and continue in a loop forever. This will basically ask for a single message, do something with it, in our case print it out, and then move on to the next message.
Lets jump over to the command line and run this. In the top panel here, I am sitting in the examples directory and going to run the first example. Lets just go into the producer directory and run that code. Alright, thats it. We sent a hello world message into our RabbitMQ server on that task_queue queue.
$ go run main.go
2019/03/06 13:16:55  [x] Sent Hello World!
We should switch over to the management interface and verify it actually worked. Cool, so you can see our graph has been updated and we have one message total. There is not much else to see on this page to lets switch over to the queues tab. Great, so you can see we have our task_queue queue define and there is one message ready. Lets click in here. This is pretty much the same information as before but can really help to get a sense of what is happening when you have messages flowing through your systems. Lets scroll down a little here, you can see we have no consumers connected to this queue right now. We can also publish messages into this queue manually if we wanted too. You can also grab messages out of the queue right here and display them. This can be useful for debugging. This is nondestructive too if you use this option. Alright, so lets get the message. Great, so you can see we have one message with the payload of “hello world”. It works. Just for the fun of it lets add a message into the queue too, lets say “testing 1.. 2.. 3..”, and publish that. Great, so now we should have two messages in the queue here.
Just to recap this basically covers the concept we chatted about earlier on creating a client or message producer and have it send messages into the RabbitMQ server. Now that we have that figured out, lets see how we consume messages out of this queue.
Going to change into the hello examples consumer client directory here. You can see our example client here that we looked at in the editor. Alright, lets run it. Great, so it connected to the Rabbit server, and pulled our two messages off the task_queue queue.
$ go run main.go
2019/03/06 13:19:08  [*] Waiting for messages. To exit press CTRL+C
Received a message: Hello World! (took: 52.588µs)
Received a message: testing 1.. 2.. 3.. (took: 63.932µs)
Lets jump back to the management interface and verify the queue is actually empty now. Great, you can see the two messages have been consumed out of the queue and we are sitting at zero now. You can also see down here we still have one consumer or worker node connected here. That is because we never shut it down. So, if new messages appeared it would consume them. Lets change back to the console and shutdown that client. So, this basically proves out and end-to-end workflow for using RabbitMQ. This is pretty basics stuff but you can use this as a powerful building block in your backend infrastructure.
For the second demo, I wanted to show you basically the same setup but with more messages and running multiple consumer or worker nodes. As, this is a little more real world.
Lets jump over to our editor again and check out this word list demo. In the producer directory here there is a list of 3000 english words. Then, in our message producer client here, we are going to parse this text file, and loop over each word and push that into the queue. So, we should end up with 3000 messages in the queue. Then in the client code here, we are basically doing the same thing as before, connecting to the server, and then we will just loop over ever message in the queue.
We can verify there is still no messages in the queue via the management interface too. Alright, so lets get started. I am just going to change into the message producer directory for our second example up here. Then, I am going to configure two message consumer worker nodes down here. So, lets run our producer app that will read in those 3000 words and push them into the task_queue queue. Perfect, it goes pretty quickly.
$ go run main.go
...
2019/03/06 13:49:18  [x] Sent yours
2019/03/06 13:49:18  [x] Sent yourself
2019/03/06 13:49:18  [x] Sent youth
2019/03/06 13:49:18  [x] Sent zone
Then, lets check out the management interface again. You can see we have 3000 messages waiting in the task_queue. Lets click in here. You can see our graphs have been updated too. Lets scroll down here and grab a few messages off the queue just to verify things are working as we expected. Great, looks like it works. So, how about we configure a couple clients to consume all these messages and print them out.
So, I am going to get both these clients ready, and then try to run them at close to the same time. Then we can watch them processing the messages from the queue. So, what is happening here is both these clients are connected the the RabbitMQ server, and each processing one message at a time. Lets check the management interface and see what that looks like. Great, you can see the messages were consumed out of the queue. You can also see some message read rates here. Just wanted to add a comment about the timing here. I actually had to add a 1 ms delay as we processed each message on these clients as it was going through too quickly for the demo. If we look at the client code here. I just added a 1 ms delay to make things a little more readable. This is a pretty fast way of passing messages around. You can also see over here, that messages were being processed by both clients, for example this zone messages was consumed by client two, and youth by client one. Pretty cool. So, this is sort of the foundation around where you could build out backend infrastructure for automating things like order processing, video transcoding, and lots of other things that you did not want to happening while users were waiting around.
$ go run main.go
...
Received a message: yield .... done in: 1.459269ms
Received a message: young .... done in: 1.489062ms
Received a message: yours .... done in: 1.19566ms
Received a message: youth .... done in: 1.221507ms
$ go run main.go
...
Received a message: you .... done in: 1.142501ms
Received a message: your .... done in: 1.169201ms
Received a message: yourself .... done in: 1.259923ms
Received a message: zone .... done in: 1.473999ms
I just wanted to chat about a few example architecture before we close out this episode. So, before I mentioned that companies like Instagram, Reddit, and Slack were using something like this. But, you do not have to be a massive company to do this. For example, here is a pretty simple architecture where you just spin up a RabbitMQ container, and then have a few worker containers that process jobs. This could easily fit into your existing architecture if you are running containers. I highly recommend checking out episode 56 on container orchestration if you have not already. This architecture works well if you have simple things you want to do, like sending email, updating records, etc.
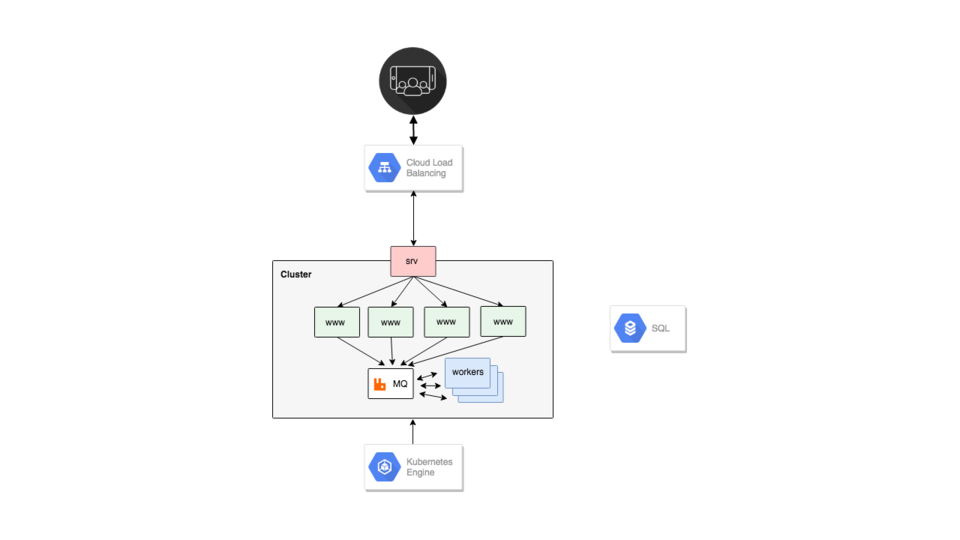
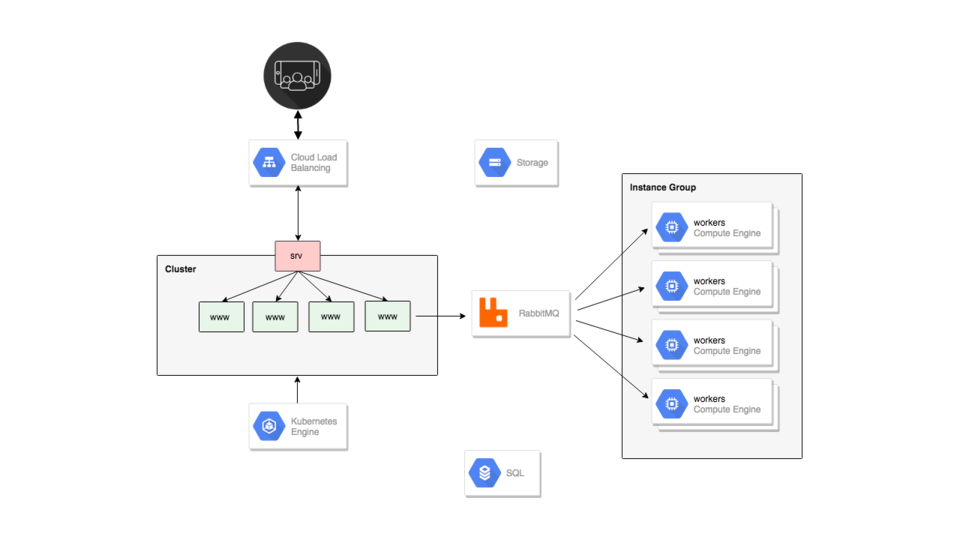
But what about more complex things? Well, this is where you get into architectures that look like this. You have dedicated servers running RabbitMQ and the Worker nodes. What use-case would drive something like this? Well, if you have thousands of worker nodes here, this is likely going to require lots of memory and resources on the RabbitMQ side of things. This might not fit nicely into your existing infrastructure. What about running lots of worker node? Well, say you are doing video transcoding, where you are converting from one format to another. Well, maybe you need lots of memory and scratch disk? This might not fit nicely into your existing container infrastructure either. This honestly depends on your architecture though.
On thing that I have seen quite often in the Cloud, is people will wrap these worker nodes in an Instance Group, then they can easily autoscale them. You can also take advantage of the AWS Spot Market or Google Cloud Preemptible VMs to get massive discounts on computing infrastructure. That is, if the type of jobs you are running can tolerate this type of thing. I have seen this type of thing run by VFX studios were they spin up massive amounts of compute and get really good discounts when doing video rendering.
What we covered today was pretty low level, so you will often want to run something that abstracts away some of the complexity of running RabbitMQ. This is where tools like Celery can be used as a layer sitting on top of RabbitMQ and have some nice options around Kicking off Tasks, Monitoring, Scheduling, and Workflows. This is really great if you are running Python and I would highly recommend checking it out. You can basically think of this as a framework for running your background tasks vs connecting to RabbitMQ directly.
Alright, that is it for this episode. Thanks for watching and I will see you next week. Bye.